s
Journal
Sparkling Summer Rhubarb Shrub Cocktail

Shrubs are the perfect introduction into the world of preservation. When making a shrub, you’re really making an infused syrup, one that has been created with fresh seasonal ingredients, fortified with vinegar, and then aged. This last step in the process of preserving allows for the ingredients to develop their flavor and build complexity.

A shrub is a fun addition to a cocktail, but can also be paired with a sparkling water or added to any other drink you’re looking to add a fresh flavor to.

Locally Harvested Summer Rhubarb Shrub Recipe

Ingredients |

Yields 2 cups Shrub

2 cups Rhubarb, or any other seasonal fruit

1 cup sugar

1 cup vinegar, white or apple cider

Make the Shrub |

Cut rhubarb into 1/4 inch pieces. In a small bowl combine the rhubarb and sugar, mix well.

Cover the bowl with plastic wrap and place in the fridge for between 4 – 5 days. Every 12 hours stir the mixture. After the 5 day’s strain out the liquid, pressing down on the solids to extract what you can. In a lidded jar combine the rhubarb syrup with the vinegar, refrigerate. You may use this immediately, but after a week the flavors will deepen in their complexity.

Prep Time |

10 minutes + 5 days in Fridge


Sparkling Summer Rhubarb Shrub Cocktail Recipe

Ingredients |

Yields 1 cocktail

2 ounces gin

1 ounce rhubarb shrub

¼ ounce fresh lemon juice

1 ½ ounces club soda

Make the Cocktail |

Place gin, shrub and lemon juice in a cocktail shaker filled with ice and shake vigorously. Pour into coupe glass and top with club soda.

Perfect for a summer get together or a day at the beach - make a batch recipe by combining all cocktail ingredients except club soda and keeping cool. Top each glass with club soda when serving.


The Art of a Well Hung Wall

Let's face it. Hanging art or photos on walls is a tough job. Not only is it an activity that leaves you with tired arms, but it's possible that the way your pieces are hung will never do them the justice they deserve!

The first, and often most difficult step, is choosing the look you want to accomplish. Gallery walls can be done in a very planned, methodical way and completed at once, or you can create a look that allows you to continually add to it and refresh the space with a more random approach. It really depends on you, your personal style, and the look you are wanting to accomplish for your home or office. Here are some helpful suggestions of how to organize your own galleries, or make them look completely unorganized; intentionally of course.

Starting with the hall above... which is, in a word... stunning. The size of these frames is large and dramatic which can be a great addition to a room that needs that bit of drama. The simple dark frames with their large, white matting (the white space between the frame and the artwork) adds great contrast to the grouping. Keeping with the same subject in each frame makes for a more sophisticated vibe going down a hallway; the theme here being a very modern approach to images of horses. I'm also totally diggin' the rug with it's very bold pattern but very neutral color combo.


Source

A simple and very useful tip is to create and hang paper cutouts traced from your frames.  This allows you to see if you like the idea that's in your head as much as you hope to. Not only does this help with laying out your pieces, but it also is extremely efficient with visualizing the scale of the pieces together with the size of your wall. Many times frames look like are going to be the perfect size, but once hung on the wall, you realize that they are either too small, or a bit too large for the space.

This diagram below can be really helpful when it comes to choosing the size of frames to use in the collection for your gallery wall.

 Source


More useful tips and inspiration...


 Source

This wall has a very creative, artistic feel. In fact, you might not recognize that all of the frames here are arranged in a very column-like method. You can see that there is a very nonchalant collection of images going into each column, which makes this style seem very easy going. Having a variation of frames and colors also adds to that feeling, making the pieces feel like an eclectic personal collection gathered over time. Notice how many different sizes of images and frames are in this collection as well, while still creating a type of grid. It’s a little bit more unexpected and adds personality to the room, without feeling unorganized or cluttered.

Source

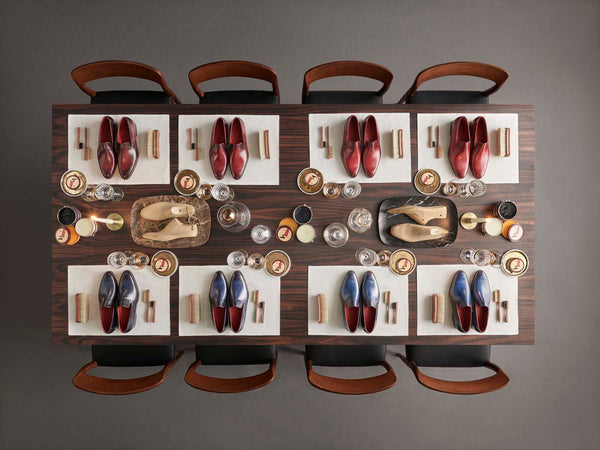
Being able to move your frames around in any which way in this gallery is so easy! You are able to switch up your space in just a couple of minutes without having to make any new holes in walls or get out the hammer. That is of course, once you've already hung the shelves securely. Making sure that your shelving is attached to studs becomes very important. Frames and the glass in them can get fairly heavy with a grouping like this, so you need to make sure that nothing will give out. I love how this scene is done mostly in black and white, with the exception of some brown in the furniture and the chrome of the fixture. Doing so makes this dining space seem a bit more dressed up. 


Source

TV’s are something that many people struggle with in certain rooms throughout the house. For many, having the television be a focal point is really no big deal. Personally, I don’t watch a ton of tv, and would prefer that the large dark box not hog all the attention. Mixing in a mounted system surrounded by frames is such a great way to switch it up. Although it is still a very bold rectangle, it seems less important when there are so many other neat pieces around it. Mounting the TV gives more room to display other favored items on the surface of the furniture below as well. The Kelly Green of that media console is also super beautiful and sleek. It stands out nicely against the light tones in this space.


Source

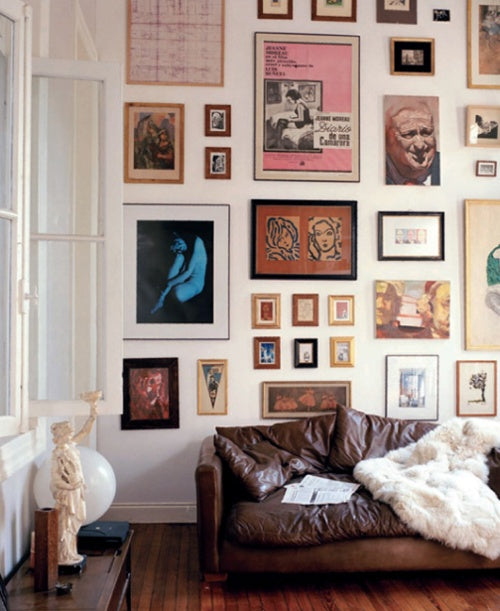
Creating a gallery wall with a more random order over time can also be done in a clean way. Whether you like the simplicity of all white frames, or prefer to stick with darker tones, creating a common denominator works best. These white frames are lightweight enough to basically cover this entire wall. I appreciate the small set of keys that are thrown in the mix for some variety. Veering away from strictly frames leaves this wall a bit more playful. With the dark piece of furniture in this scene, I think the white frames were a lovely choice!

 Source

Last but not least is this really awesome wall for a children’s room done by our friends at SAS Interiors! Although this one is a bit custom with it’s recessed frames, I love that they are hung in such a simple and structured manor. Placing such large frames in a grid of nine that spans the wall is bound to give a room a sense of order… even at times when there are a billion different toys laying around.

Do you have an example of your own gallery wall or a style you love? Post a link and share it! You can find these examples and more on our Pinterest.


Flowers add Color

Source

Flowers are an easy, inexpensive and impactful way to add color to a room.   Just look at your favorite photos of interiors.  Nine out of ten have flowers or some sort of greenery.  Why… because with them, suddenly your room has energy and life.

If you want to get more sophisticated you can match the color of your flowers to something in the room you would like to highlight, say a favorite art piece.  Suddenly your eye is drawn right to that piece.

I’ve gathered some arrangements below that will take five minutes.  Besides, I’m drawn to their un-fussiness.


bottom source, top source

I can easily adjust these arrangements for whatever flowers are in season on my weekly trip to the farmer’s market or grocery store.

(Clockwise from top left.)  The first arrangement uses the same flower throughout.   Here they've added interest by graduating the color, starting with the lightest blossoms in the center and working out to the deepest hues.  The stems need to stay a little taller for the center of the arrangement and gradually taper as you get to the rim of your vase.  Aren't these Lilacs so romantic?  If your going for a more elegant or formal look, try it with roses.

For the next arrangement you will need some supplies: floral frogs (round little metal spiky things) and clay to secure them in the bowls.  Other than having those things on hand, it is a snap to put together.  Just secure the frogs in the bottom of your container with the clay, push one or two stems into the spikes and add water .

Lastly, just one beautiful bud in an interesting container can have an amazing amount of impact.  Be creative with your containers, here it's just an ornate mug.   Or do a grouping of single buds, each in their own vase like below.  Still incredibly easy.


Cantal Cheese Tart

Via Bon Appetit/Source

Ever since moving to Seattle, I can't get enough of two things... cheese and chocolate.  It has something to do with the cold rainy weather that has me craving these comforts.  This recipe comes from Le Temps Des Vendages, a city in Southern France via Bon Appetit's May 2010 issue.  Although it is perfect paired with a salad, clearly, the cream, butter, and cheese in this recipe do not qualify it as a particularly healthy choice.  Unless maybe you consider cheese to add something to your happiness.  Mental health is important, right?

The Cantal cheese can be substituted with an English farmhouse cheddar or a sharp white cheddar, I'm using Beechar's Flagship, a cheese made locally here in Seattle.  Making the crust is a little challenging, but the filling is a breeze.

Ingredients:

Crust
1-1/4 cups all purpose flour
1/4 tsp. salt
6 tbsp. chilled unsalted butter, diced
3 tbsp. (or more) ice water

Filling
1 tbsp. unsalted butter
1/2 cup chopped shallots
1-1/4 cups heavy whipping cream
3 large eggs
1/8 tsp. freshly ground black pepper
1/8 tsp. freshly grated nutmeg
Pinch of salt
2 cups coarsely grated rindless Cantal cheese (or substitute)

Directions:

1. Blend flour and salt in processor for 5 seconds.  Add butter and cut in, pulsing on/off turns, until a course meal forms.  Add 3 tablespoons of ice water.  Blend until moist clumps form, adding more water if dough is dry.  Gather dough into a ball, wrap it in plastic and refrigerate for at least 1 hour and up to 1 day.

2. Roll out the dough on a lightly floured surface to about 12" - 13" round.  Transfer to a 9" tart pan with removable bottom.  Create a 1/2" overhang by cutting off any excess dough.  Fold overhang in and press sides so that the sides of the dough rise 1/4" to 1/3" above the rim of the pan.  Freeze the crust 15 minutes.

3. Preheat the oven to 375 degrees.  Line the crust with foil and fill with beans or pie weights.  Bake about 25 minutes until sides are set.  Remove beans and foil and bake until crust is golden about 20 minutes.  (Peirce with a fork if the crust bubbles.)  Cool crust.  Lower oven temperature to 350 degrees.

4. Melt butter in a heavy medium skillet.  Add shallots.  Season with salt and pepper. Saute until soft about 4 minutes.  Meanwhile whisk cream, eggs, pepper, nutmeg, and salt in a medium bowl.  Mix in cheese.  Spread shallots in crust. Pour cream mixture into crust.  Bake until filling is set in the center, 35 to 38 minutes.  Cool for 15 - 30 minutes and serve warm or at room temperature.

  • Page 1 of 3
  • Page 1 of 3